
- Steel ruler
- Stanley knife (45 degree)
- Sandpaper
- Squeegee
- Needle or pin
- Soft cloths
- Cleaning solution (alcohol, white gasoline or otherwise)
- Industrial heat gun
- Optional: BODAQ water-based Primer
- Optional: Brush
- Optional: Rolling brush
| Surface | Preparation method |
|---|---|
| General instructions |
A. Scuff uneven surfaces with a sandpaper and apply hard-type putty where necessary for a flat surface. B. If you have to cover the whole surface with putty, sand it 2 to 3 times after drying to ensure a flat surface. C. C. If you are only patching with putty, it is good practice to use the same color putty as the original surface. |
| Woodproducts |
A. Scuff the surface with sandpaper. B. Apply putty on uneven areas and smooth with sandpaper. C. Clean surface with cleaning solution. C. Coat with BODAQ primer 2 or 3 times and allow to dry after each coat. Adhere film after drying for 2hours (Water type). |
| Untreated steel, electro- galvanized steel |
A. Remove rust and stain with sandpaper and clean the surface with cleaning solution. B. Apply putty on uneven areas and smooth with sand paper. C. Coat with BODAQ primer D. Adhere film after drying for 2hours (Water type). |
| Aluminum, stainless steel, painted steel |
A. Abrade uneven and welded areas with sandpaper. B. Remove stains with cleaning solution, apply putty on uneven and welded areas and smooth with sandpaper. C. Apply BODAQ primer and adhere film after drying for 2hours (Water type). |
| PVC laminated steel |
A. Check that the surface is in good condition to avoid low adhesion and bubbling. B. Remove stains with cleaning solution and apply BODAQ primer. C. Adhere film after drying for2hours (Water type). |
| Painted surfaces |
A. Test paint type and condition for adhesion by pre-applying a small piece of film on the surface. B. Remove stains with cleaning solution and make sure that the surface is not damaged. C. Apply putty on uneven areas and smooth with sandpaper. D. Apply BODAQ primer and adhere film after drying for 2hours (Water type). |
| Melamine laminates, polyester coated laminates |
A. Abrade the surface with sandpaper and remove stain with solvent. B. Adhere film after complete primer dry for over 30minutes(PM02-Solvent type). Adhere film after complete primer dry for over 2hours(PM04-Water type). |
| Plastics |
A. Avoid substrates that contain any additives. B. Substrates such as flexible PVC, PP, Nylon and fluorine are especially not recommended. C. Remove stains with cleaning solution. D. Priming is not required, adhere film straight away. |
| Mortar, limestone |
A. Finish with steel trowel after joints are filled correctly to prevent cracks. B. Allow substrate to dry for a minimum of 3 weeks. C. Remove stains with sandpaper or wire brush and clean the surface. D. Coat surface with sealer and apply putty over the whole area for better adhesion. E. Apply BODAQ primer and adhere film after drying for 2hours (Water type). |
| Gypsum board, calcium silicate board, asbestos slate |
A. Fill voids with filler and apply putty after sealer coat. B. Abrade the surface with sandpaper and clean with cleaning solution. C. Apply BODAQ primer then adhere film after drying for 2hours (Water type). |
Standard Steps
1. Measure the application surface dimensions.
2. Cut the product to size with 2-4cm extra leeway on all sides for trimming.
3. Align the product with the application surface then pull the release paper about 5-10cm and stick the film onto the surface.
4. Continue aligning the film by peeling and reapplying as needed until you are satisfied.
5. Apply the rest of the film by peeling the release paper 30cm at a time working from the top to bottom.
6. Use a soft cloth or wool squeegee to apply pressure onto the film from middle out towards both edges in order to push out any air bubbles.
7. Use a hard squeegee at a 45-degree angle to get a tight fit onto edges and corners.
8. Large air bubbles can be removed by pricking the bubble with a pin and pushing the entrapped air towards the puncture.
9. Press the entire panel again with a soft cloth or wool squeegee.
10. Cut off any excess trims using a Stanley knife.
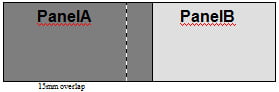
11. Overlap the film by 1.5-2cm when installing two BODAQ panels side by side. Use BODAQ primer for the overlapped part. Refer to the diagram below.
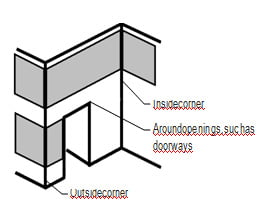
2. If applying two BODAQ panels at the internal corner, overlap by at least 0.5cm.
3. If the temperature of the room is under 20 degrees Celsius, apply the film while heating evenly. Do not overheat as it may cause the film to wrinkle.
2. When cutting the film, measure and cut the film at least 10cm larger than the curved surface.
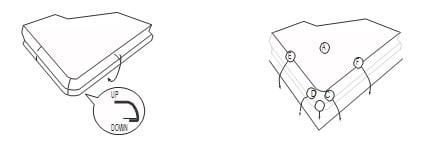
3. Apply BODAQ primer to the curved surfaced as shown in the diagram (coat along the area illustrated as UP and DOWN)
4. When applying the film, apply heat before pulling the film firmly around the corner as shown in the diagram (marked as A, C, D, E & F).
The embossing has a delicate directional pattern.Take care to install panels in the same direction, as if they are installed in opposite directions this can give the appearance of color variation.
When applying the primer to installed walls, apply it to prime alternated panels so that overlapping film does not become adhered to adjoining panels prior to being installed into the joins.
Do not forget to check out the type and condition of material (MDF, etc.) to attach films to so as to identify any parts that might cause a problem.
In the case of MDF, a different density might cause incoherent adhesive strength and printing resistance performance. It is necessary to use MDFs with consistent density.
It is necessary to use alcohol to remove pollutants from the surface to be sprayed, and check if there is any damage to the sprayed face due to solvents. If it has an uneven surface, you can apply putty then finish with sandpaper. Use a dust brush to remove foreign substances.
In case of steel plates, remove any surface pollutants first with alcohol, lacquer or thinners. For an uneven surface, apply putty, then finish with sandpaper. Use a dust brush to remove foreign substances.
Do not forget to carry out a prior inspection for any problems (pattern name, appearance, etc.) for products selected by customers.
Film application should be done after woodwork and before painting or wallpaper hanging.
It is necessary to finishing thoroughly with sandpaper for cross section parts which are to have film applied (MDF etc.).
In particular, if the material is wood (MDF, PB, etc.), the smoothness of an edge or crevice is very important. Therefore, you should finish the part with sandpaper or with pate treatment before proceeding any further.
During primer treatment, a cross section of wood (MDF, PB, etc.) tends to absorb more primer than other parts. Thus, spray at least 2 or 3 coats of primer. Once primer is applied, the next treatment should start when the previous primer has completely dried.